Difference between revisions of "I2C Implementation on PIC" From Rikipedia Embedded Wiki
Ajay Bhargav (talk | contribs) m (→See Also) |
Ajay Bhargav (talk | contribs) m (→Help & Queries) |
||
| Line 156: | Line 156: | ||
== Help & Queries == | == Help & Queries == | ||
If you have any queries, doubts or feedback on this tutorial please share in our [http://www.8051projects.net/forum.html discussion forum]. | If you have any queries, doubts or feedback on this tutorial please share in our [http://www.8051projects.net/forum.html discussion forum]. | ||
| − | |||
[[Category:Tutorials]] | [[Category:Tutorials]] | ||
| − | [[Category:PIC Tutorials]] | + | [[Category:PIC Microcontroller Tutorials]] |
| − | |||
{{#seo: | {{#seo: | ||
|title=I2C implementation on PIC16F877 microcontroller | |title=I2C implementation on PIC16F877 microcontroller | ||
Revision as of 19:11, 6 March 2015
PIC 16F877 (MSSP) I2C Introduction
Most of PIC controllers specially 16F and 18F series have on-chip I2C Modules. In this section of tutorial we are going to talk about PIC16F877A I2C Module and all derivatives of PIC has same module i.e. similar registers to configure. Lets take a look at the important registers which are to be configured to make I2C modules active and running on a PIC microcontroller.
For I2C master mode, there are three important register are to be configured
- SSPSTAT: MSSP Status Register
- SSPCON1: MSSP Control Register 1
- SSPCON2: MSSP Control Register 2
SSPSTAT
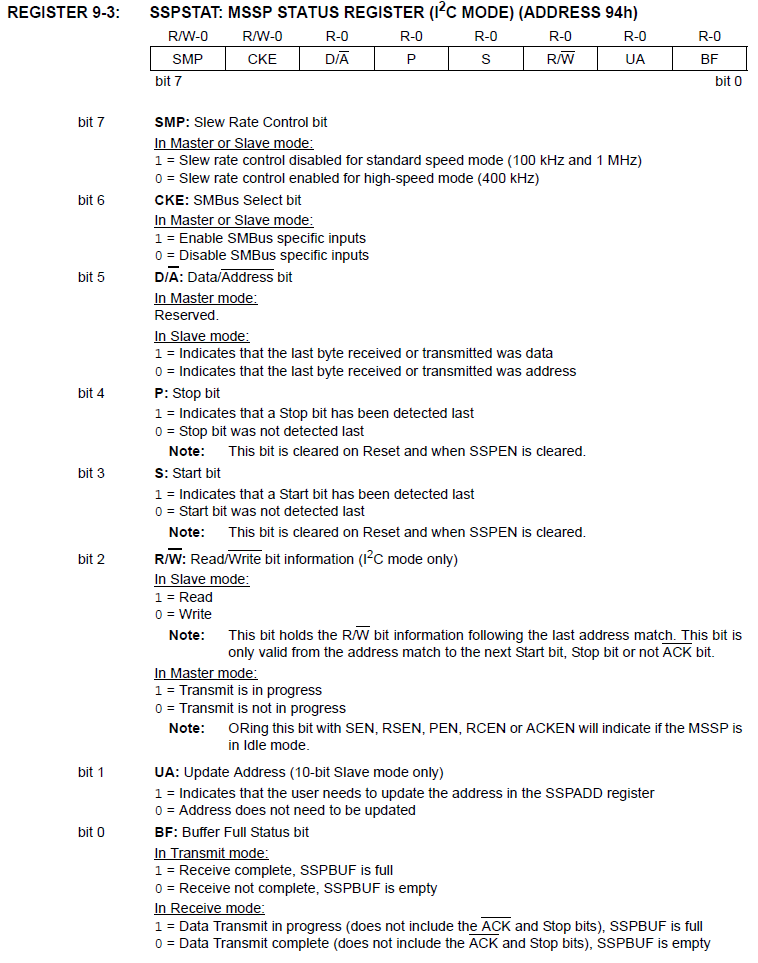
SSPSTAT: MSSP Status Register
SSPCON1
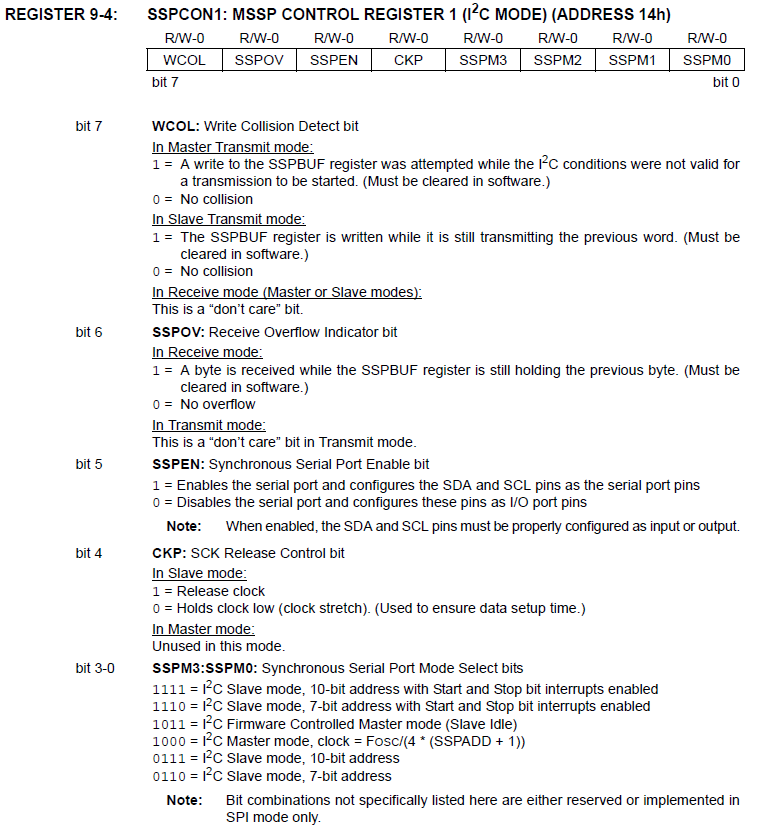
SSPCON1: MSSP Control Register 1
SSPCON2
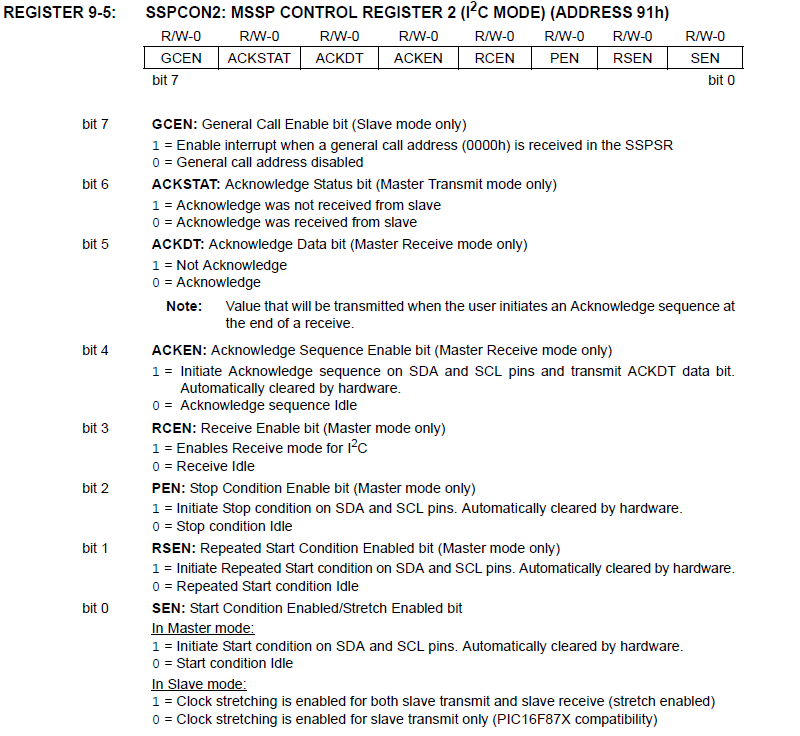
SSPCON2: MSSP Control Register 2
MSSP Baudrate Generator
In I2C Master mode, the Baud Rate Generator (BRG) reload value is placed in the lower 7 bits of the SSPADD register (Figure 9-17). When a write occurs to SSPBUF, the Baud Rate Generator will automatically begin counting. The BRG counts down to 0 and stops until another reload has taken place. In I2C Master mode, the BRG is reloaded automatically.

MSSP Baudrate Generator
PIC 16F877 HiTech C Code Example
We've already gone throught the important registers which are needed for configuring I2C in master mode. Lets take a look at a practical example. Following code is written for Hi-Tech C compiler. You can also write similar code for other compilers. This code will give you idea how and what registers are to be configured.
/*
Function: I2CInit
Return:
Arguments:
Description: Initialize I2C in master mode, Sets the required baudrate
*/
void I2CInit(void)
{
	TRISC3 = 1;      /* SDA and SCL as input pin */
	TRISC4 = 1;      /* these pins can be configured either i/p or o/p */
	SSPSTAT |= 0x80; /* Slew rate disabled */
	SSPCON = 0x28;   /* SSPEN = 1, I2C Master mode, clock = FOSC/(4 * (SSPADD + 1)) */
	SSPADD = 0x28    /* 100Khz @ 4Mhz Fosc */
}

/*
Function: I2CStart
Return:
Arguments:
Description: Send a start condition on I2C Bus
*/
void I2CStart()
{
	SEN = 1;         /* Start condition enabled */
	while(SEN);      /* automatically cleared by hardware */
                     /* wait for start condition to finish */
}

/*
Function: I2CStop
Return:
Arguments:
Description: Send a stop condition on I2C Bus
*/
void I2CStop()
{
	PEN = 1;         /* Stop condition enabled */
	while(PEN);      /* Wait for stop condition to finish */
                     /* PEN automatically cleared by hardware */
}

/*
Function: I2CRestart
Return:
Arguments:
Description: Sends a repeated start condition on I2C Bus
*/
void I2CRestart()
{
	RSEN = 1;        /* Repeated start enabled */
	while(RSEN);     /* wait for condition to finish */
}

/*
Function: I2CAck
Return:
Arguments:
Description: Generates acknowledge for a transfer
*/
void I2CAck()
{
	ACKDT = 0;       /* Acknowledge data bit, 0 = ACK */
	ACKEN = 1;       /* Ack data enabled */
	while(ACKEN);    /* wait for ack data to send on bus */
}

/*
Function: I2CNck
Return:
Arguments:
Description: Generates Not-acknowledge for a transfer
*/
void I2CNak()
{
	ACKDT = 1;       /* Acknowledge data bit, 1 = NAK */
	ACKEN = 1;       /* Ack data enabled */
	while(ACKEN);    /* wait for ack data to send on bus */
}

/*
Function: I2CWait
Return:
Arguments:
Description: wait for transfer to finish
*/
void I2CWait()
{
	while ((SSPCON2 & 0x1F ) || ( SSPSTAT & 0x04 ) );
    /* wait for any pending transfer */
}

/*
Function: I2CSend
Return:
Arguments: dat - 8-bit data to be sent on bus
           data can be either address/data byte
Description: Send 8-bit data on I2C bus
*/
void I2CSend(unsigned char dat)
{
	SSPBUF = dat;    /* Move data to SSPBUF */
	while(BF);       /* wait till complete data is sent from buffer */
	I2CWait();       /* wait for any pending transfer */
}

/*
Function: I2CRead
Return:    8-bit data read from I2C bus
Arguments:
Description: read 8-bit data from I2C bus
*/
unsigned char I2CRead(void)
{
	unsigned char temp;
/* Reception works if transfer is initiated in read mode */
	RCEN = 1;        /* Enable data reception */
	while(!BF);      /* wait for buffer full */
	temp = SSPBUF;   /* Read serial buffer and store in temp register */
	I2CWait();       /* wait to check any pending transfer */
	return temp;     /* Return the read data from bus */
}
See Also
- I2C TWI Tutorial
- I2C Implementation on 8051
- DS1307 I2C RTC Interfacing Tutorial
- AT24xxx I2C EEPROM Interfacing
- LM75 I2C Temperature Sensor
- ads1115 I2C ADC Interfacing
Help & Queries
If you have any queries, doubts or feedback on this tutorial please share in our discussion forum.